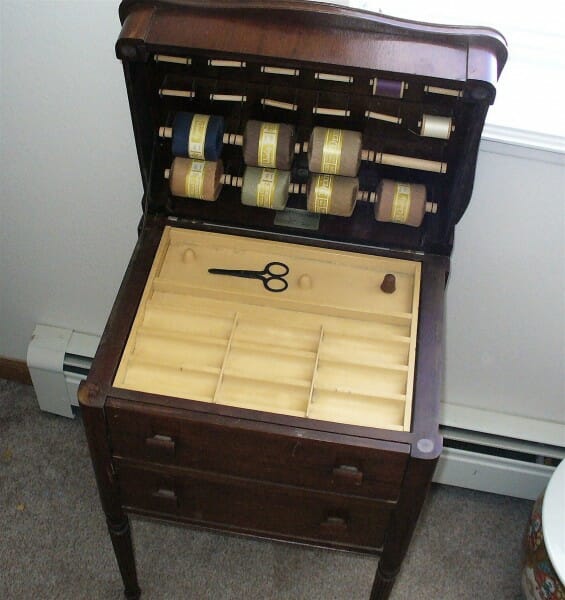
Since I am the only one of my cousins who has any sewing abillities, I got all my Grandma’s sewing things when she passed away. This little sewing accessory cabinet was one of those treasures.
I usually don’t like to hang onto family heirlooms unless I can put them to use somewhere in my home.
I knew that I could use this piece as a night stand, but didn’t care for the dark wood stain…so I painted it!
I say it a lot — but you really CAN’T go wrong with paint. It’s such an inexpensive way to completely transform a room, a wall, a piece of furniture, or even a book! All it requires is a bit of elbow grease, a tiny amount of creativity, and a few hours.
Here are the simple steps I used in this project:
1. Sand
- A light sanding is only necessary if the surface of your furniture is dirty, rough, chipping, peeling, etc.
- If your furniture is in good condition, don’t waste time sanding…simply move to step 2.
{Professionals will tell you to sand EVERYTHING…thankfully I’ not a professional!}
2. Clean:

- Use Mineral Spirits or Denatured Alcohol and a clean rag to thoroughly wipe down and scrub all hard surfaces
- This removes excess oil, dirt, grim, etc. and “dulls” the surface, making it easier for paint to adhere.
3. Pick Your Paint:
- I almost always use Behr Paint and Primer in One to save time.
- If you want a specific color to show through, paint 1 or 2 layers of that color first (your base coat). Let dry.
- If you want the wood to show through, move to step 4.
4. Wax:
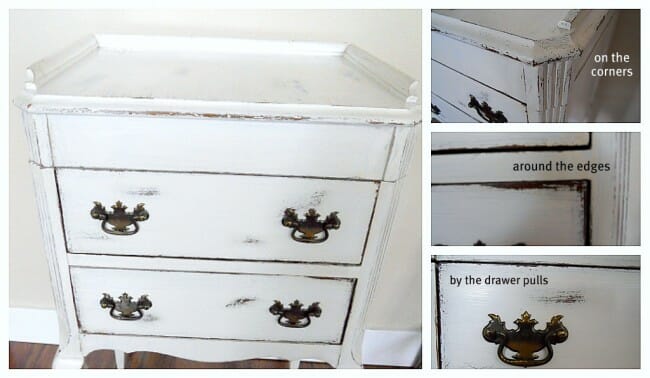
- Take a plain white candle and rub it over any area you want to “antique”.
- The candle wax adds a protective layer over your undercoat or wood and prevents the top coat from sticking to it.
- I applied wax around the edges, the corners, the handles, and areas that would naturally be a bit worn.
5. Top Coat:
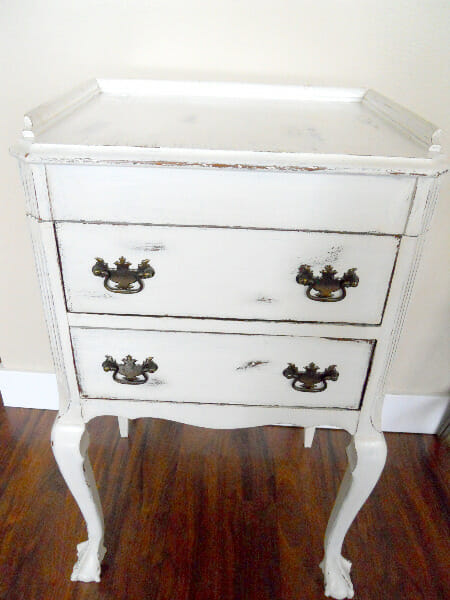
- Paint an even layer of your top coat. I used an antique white color.
- The top coat goes right over the wax.
- You may add as many layers as needed, letting each layer dry in between. (I usually do 2 layers)
6. Sand:
- Once the paint has dried, I use steel wool to rub off the paint in the areas I want to look worn.
- Start off with light pressure and increase as necessary to get the look you want.
- There is no right or wrong way to do this…so just start and see where you end up!
7. Finishing Touches:
- You may add a clear coat to prevent the paint from additional pealing or chipping (I normally don’t do this)
- Add fun, decorative hardware for the drawer pulls.
That’s it! Your done and you have a like-new piece of furniture to show for yourself.
Here’s a good video to introduce you to the basics of painting furniture.
Get creative and see what you can come up with!
Here’s my finished night stand!
What was the last thing you painted?


Candace says
Hi Andrea,
What exact paint (“Antique White”) did you use for these white distressed pieces? My daughter wants her dresser re-done and I have a beautiful dresser with good bones, but it’s seen better days as far as the coating. Also, what brand of palm sander do you use?
Thanks!
Andrea says
Hi Candace, I usually use a tinted wax over anything I want to distress — so any color paint I use (usually Antique White from Bher) is applied, left to dry, and then rubbed with a darker wax to give it more of an aged look.
I believe our palm sander is just a “Black and Decker” brand.
Search Pinterest for “distressed paint tutorials” and I’m positive you’ll find more information than you need! 🙂
Tess says
It is beautiful… I love that shabby look way better than dark older woods also. Everyone is saying how different it looks, and what a transformation! But with all due respect to the finished piece and the well done job you have done…am I the only one who sees this After as a completely different piece than the Before?
Are you saying the top picture is the same cabinet? If it is have you also changed out the legs from straight legs to french provincial legs?
Have you changed the top from a curved top to a straight edged top? And from a straight edged bottom to a curved bottom? If so it is way more than just a paint job.
Maybe you used a stock photo if you had not taken a pic of your Gradmother’s piece before, but why are you not correcting everybody who is saying “amazing transformation!” and stuff like “Looks so different”?
b says
One question – is the sewing cabinet originally veneer? Do these instructions work if it is wood veneer?
Thanks so much!
Andrea says
No, it’s real wood but yes, these techniques work fine on veneer!
Ellie says
What a great way to make something you inherited become something you love! Visiting from POPP at Domestically Speaking.
Maryann @ Domestically-Speaking says
Beautiful, creamy transformation!
Jen says
Great job! Love the paint job!
Cathy says
It looks fantastic! What a great way to keep an heirloom and make it useful!
petie says
We have a lot in common! I just posted my family inherited, painted white, night stands. Great job. Yours has a lot more character inside 🙂
Andrea says
I’m a HUGE fan of white! It can cover a multitude of sins!
Kristine says
That is sooo different after some paint. I especially love the way you’ve staged it (I have two of those IKEA clocks!). The fact it was your grandma’s sewing cabinet makes it extra cool.
Kristine
The Painted Hive
xxx
Michelle @ Sweet Something says
That turned out beautiful Andrea! It looks fantastic next to your bed, great job!
Andrea says
Thanks, Thanks, and Thanks!
It was a fun project to do…and I just LOVE how it turned out.
Karie Jackson says
What a treasure! I love how you have redone it. It is beautiful. Thanks for sharing.
Julie says
Great job!
the cape on the corner says
looks great! i am (im)patiently waiting til i find the right piece to spraypaint. not having any luck thus far, but yours looks great. coming over from keeping it simple.
Kaysi @ Keeping It Simple says
LOVE the white, looks great!
Kathleen@betweenblueandyellow says
Looks really cute! Great job 🙂
Ashlee says
what a transformation! And a fun way to use and beautify an heirloom! I’d love it if you’d stop by my Topsy Turvy Tuesday Link party and add this cabinet!