
As I mentioned in this post, one of the things I really wanted to finish before the new baby arrives was defrosting our deep freezer in the basement. We have been meaning to do it for a few months now, but wanted to wait until it was nice and cold outside so we wouldn’t have to worry about packing all the food up in coolers to keep it cold.
So two weeks ago, I told Dave, “today is the day” (for the freezer, not the baby!) and I went downstairs to start unloading the freezer.
It honestly wasn’t that bad, it didn’t take that long, and it sure feels good to be done with it.
Today, I’m sharing our simple freezer-defrosting process with you — but before we get too far into this post, I want to take a minute to answer a few questions I get over and over regarding our deep freezer…
.
1. Why do you have a manual defrost freezer when you could get a frost-free freezer?
This is actually a pretty good question if you’ve never done any research about freezers. After all, wouldn’t it be SO much easier to buy a frost-free freezer and never need to deal with the hassle of manually defrosting it every couple of years?
Yes, it would be less work, but a frost-free freezer also has the potential to cause more freezer burn on your food because the temperature is always fluctuating (warmer to prevent any ice from building up, then colder to cool the food back down again). It’s not a huge deal — but if you want to store your food long-term (6-18 months) you’ll definitely want to buy a MANUAL DEFROST freezer.
So yes, we have to deal with this frosty build-up every couple of years — but as a results, our food stays fresher longer!
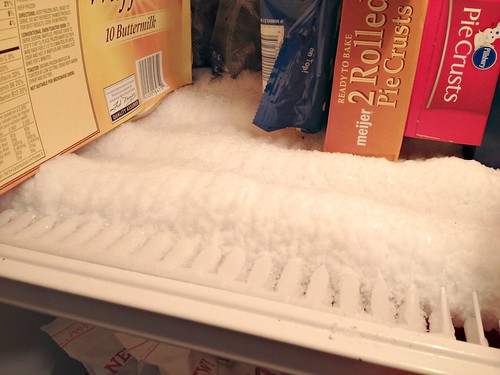
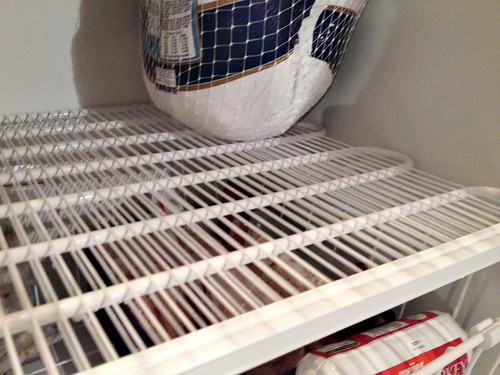
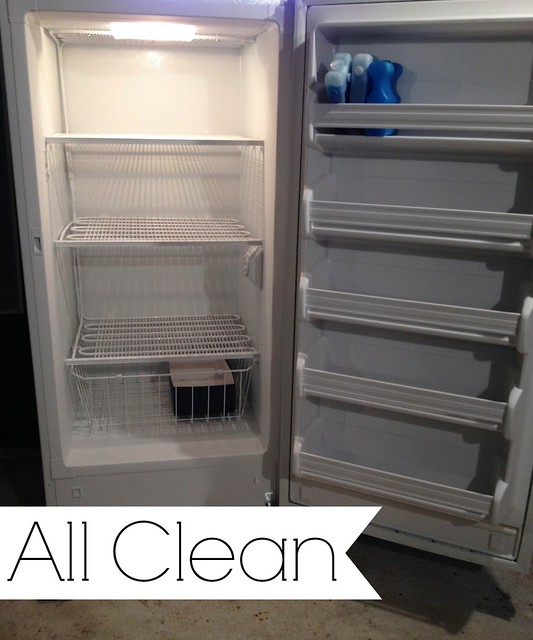
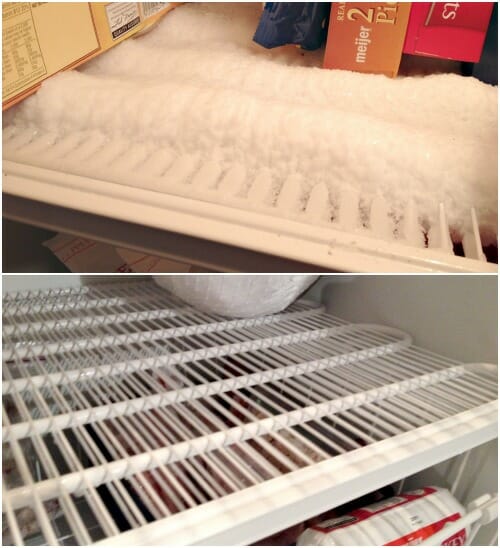
Plus, it only took us about 2 hours to go from the photo above to the photo below… so not that bad considering the money we’ve probably saved on freezer-burned food over the past 2 years!
2. Why do you have an upright freezer versus a chest freezer.
We have an upright freezer simply because that’s our preference. Neither one of us like digging through chest freezers — which is especially inconvenient when you have a large belly!
It’s true that you can technically fit more per square foot in a chest freezer, but the convenience of being able to quickly see everything we have in the freezer and keep everything nicely organized is more beneficial for us.
3. How often do you defrost your freezer?
This is the first time we defrosted this freezer since we purchased it over 2 years ago — and it honestly wasn’t THAT bad. Ideally, I think the stores would tell you to do it every year, but with our old freezer and this new freezer, we just did it whenever we felt it was necessary and whenever we had time.
Obviously, you don’t want to to let the ice build up too much as it will take away from the amount of space you have to store your food — but I’d say every year to every 2 years would be about right.
.
OK, Now Let’s Talk About HOW we Defrost our Deep Freezer:
The process was actually pretty simple, relatively painless, and only took about 4 hours from start to finish (and that included the time we let the freezer cool down again before loading it back up.)
The actual time to defrost and clean the inside of the freezer was just a little under 2 hours (not bad if you ask me.)
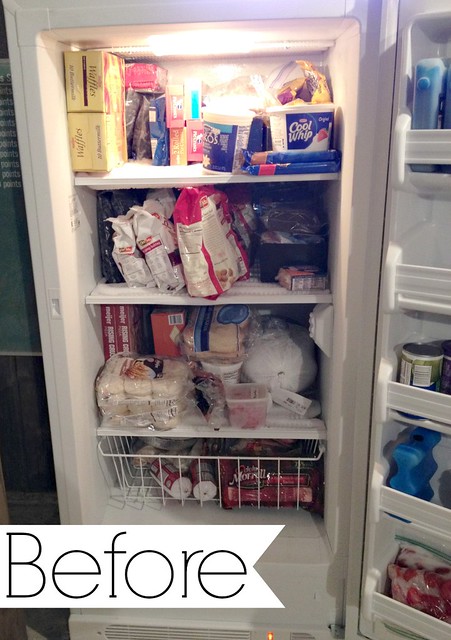
Here’s a look at our freezer before.
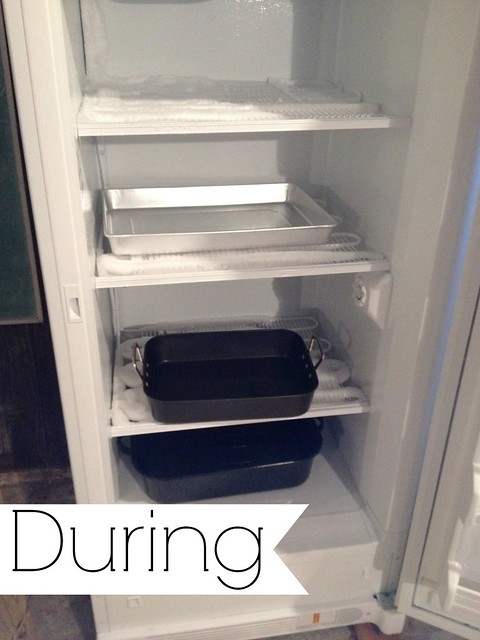
Not totally horrible, but definitely getting some ice build-up and definitely not as organized as it could be.
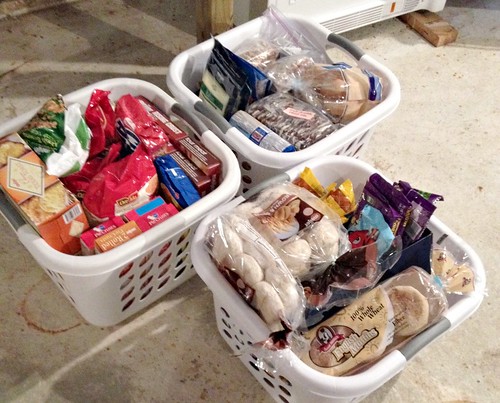
STEP 1: Unplug freezer and remove all contents.
This is probably the most annoying part for me. Thankfully all I had to do was load up our food into laundry baskets. Dave took care of the “heavy lifting” to bring everything outside to sit under our covered breezeway.
It was only about 10*F outside when we defrosted our freezer so the food actually stayed pretty cold!
STEP 2: Prepare for lots of water!
Once the freezer was empty, I put large pans on each shelf to catch the majority of the dripping water from the shelf above. You could also put thick towels on each shelf and then ring them out periodically.
STEP 3: Add a portable heater for efficiency.
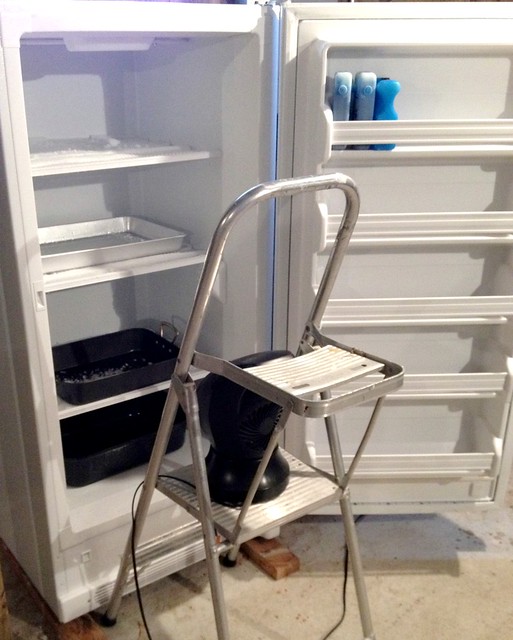
Then we put a small space heater in front of the freezer to speed up the process.
I went downstairs every 20-30 minutes to check on the progress and empty the pans. I also used a plastic putty knife to chip away at some of the larger chunks that were melting away but not fully disconnect yet. This really helped to speed up the process in my opinion (if you do this, I’d definitely use a plastic putty knife so you don’t scratch anything inside the freezer).
STEP 4: Dump out pans, wipe out access water, and clean the inside.
Once all the ice had melted away, I wiped out any extra water with a super absorbent microfiber cloth — and then also wiped down the dust, dirt, and crumbs on the inside of freezer.
STEP 5: Plug it back in and wait for it to cool down.
Once we plugged it back in, it only took about 2 hours for it to get nice and cold again.
STEP 6: Load up the food.
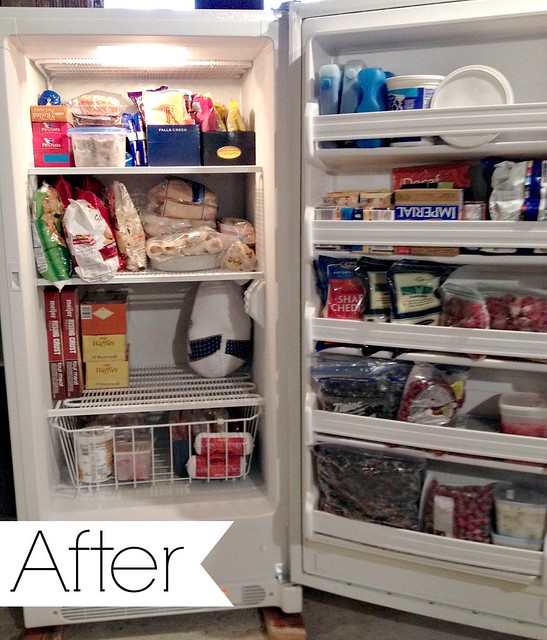
After it was cold enough, we brought the food back in and I took just a few extra minutes to organize it a bit better than it was before.
I also took note of items that might have been in there for a while and planned to use those things up in our next meal plan (or at least in the next couple weeks).
Then I made a list of things I wanted to make or buy to re-stock our freezer over the next few weeks before baby — just so I can cross one more thing of my to-do before baby list!
Can you believe that there was the same amount of food in the before and the after pictures — it’s just organized A LOT better in the after pictures.
And if I’m really honest, there is actually a bunch of food from our kitchen freezer in the after picture because we had so much extra room and I know that the food will keep longer in the deep freezer!

Ahh… so much nicer without all that icy build-up — and now I don’t need to think about it again for another 2 years!

Evelyn Mayfield says
Oh, wow, I am SO happy you posted those photos. I thought my upright freezer was the only one with that much build-up. I am going to try a method someone told me about. Tonight, before I go to bed, I’ll turn it off but leave the door shut. When I wake up, I’ll begin as usual. The theory is that overnight, there is a slight warm-up that makes the ice sweat from inside out and makes it easier to fall and causes less liquid water – I will let you know how it goes.
I did my research and learned the food in there is safe for at least a day and I would only be doing this fore about 6 hours before fully going at it.
Andrea says
haha — all manual defrost freezers get this much buildup (unless you defrost them constantly!)
Hope you new defrosting method works well for you!
Mark says
Great advice on cleaning freezer. This goes to bookmarks 🙂 Thnx Mark
Kylie says
Thanks, Andrea!! What size capacity is your freezer?
Kylie says
Hi Andrea!
This was a very helpful post.
We are considering purchasing an upright freezer and hoped you could help with a couple questions.
What size is your freezer? and do you ever wish you’d bought a full fridge & freezer? We don’t have kids yet and our fridge gets pretty full. I thought since you are a family of 4 and growing you might be able to better respond to this.
Thanks so much…
Andrea says
Hey Kylie,
We actually DO have another full-size fridge/freezer in our heated out-building (it’s like a big living room/hangout area). We have a fridge, microwave, etc. our there with table and chairs, couches, TV, etc. We don’t use that fridge often — mainly just to keep extra pop/beer cold or when we are having people over.
Keep in mind that if you are looking for a “deep freezer” to keep your food fresher longer, a fridge/freezer combo will not do that. You’ll definitely want to get a manual defrost (not a frost-free) deep freezer as your food will stay the freshest for the longest amount of time.
however, keep an eye out on Craigslist — that’s where we found the deep freezer at our first house ($75) and that’s where we got our extra fridge/freezer ($150). Maybe you could buy both!!
janaka says
lol, i just prepared some boiled water and pour them into deep freezer, it took only few minutes(around 10 minutes) to clean the refrigerator completely. 😛
if you try, just try to pour boiled water to be touch plates, so that you can remove large ice pieces. I got a coconut leave and used it as pipe to do that 🙂
anonymous says
Hi, thanks, it make sense. But i am wonder why your wafers are in the fridge? 😉
Tom says
Thanks for sharing. Defrosting is a pain and doing it haphazardly makes it worse.
Natalie says
Wipe the empty freezer out with glycerine/glycerin the next time you do it. It reduces the time significantly because any ice simply sheets off one it has defrosted a little. I’ve heard of people using spray oil (not for me though, the fumes!!), and possibly any old kitchen oil would work too, but I’ve only used glycerine. It REALLY works! I have fibromyalgia, any shortcut I can take is worth sharing, IMO
Andrea says
Never thought of this before — but I can see how it would work well. I’ll keep this nugget tucked away for 2 years from now when we defrost our freezer again!
Chris says
I used to do that years ago, but have had self defrosts for so long that I had forgotten that trick. Have a manual defrost chest freezer now so this tip is so appreciated!!
Cindy says
Thanks to you we now have a defrosted and clean freezer! It took longer than we expected but that’s only because it was WAY overdue. I’d been eating down the inventory for a while in preparation but had been intimidated by the process of actually defrosting it. Your step-by-step was really helpful. The heater idea was key! Thanks for much…one more project down and I won’t be intimidated the next time defrosting comes around.
Courtney says
You had mentioned this on Facebook a little while back and inspired me to do it last weekend. We also had cold weather and snow so I was able to sit my baskets of food out in the snow. I am amazed at how much more room I have in the freezer now and it also helped remind me of what all was out there! Loving my organized defrosted freezer!
Trudy says
Back in the day, I would use a hair dryer to help defrost the freezer and my husband (who’s a chef) told me to use a regular fan. Wow, what a difference. I have one of those fan’s on a tall stand that oscillates……it went even faster with the fan. By just circulating the warm air, you would be surprised at how fast it goes
Tara says
This is a great reminder. I defrosted our freezer about a year ago. It wouldn’t really need it again except for the time my husband grabbed something out of it and didn’t get it completely closed when he left it. Instant inch of ice. 🙁 You make it sound so simple and painless that I’ve almost forgotten how much I dislike defrosting.
Thankfully, the freezer is excellently organized with my favorite clear multi-purpose bins from Container Store. So removing everything should be pretty painless and quick. Except I’m afraid I’ll have to defrost some of the containers too. They’re kinda frosted up from their open door escapade. Have fun filling yours back up, but don’t work too hard. Let all your friends and family know you’ve got some room there they can help you fill too. 🙂
I woke up thinking about you today and how soon you’ll be having baby #2. So many prayers for you that it all goes smoothly for everyone in your house. Children are a blessing of the Lord. Your heart will expand so greatly when that new baby lands in your arms and I am overjoyed for you already. I hope it’s encouraging for you to know how many people are thinking of you and praying for you in these last weeks. Blessings!
Andrea says
Aww, thanks Tara! just under 5 weeks to go and I’m still feeling pretty good. I have a lot that I’d like to get done yet, but everything that absolutely HAS to be accomplished is — so that’s reassuring 🙂
And yes, I definitely hope a few friends and family members will help us fill our freezer over the next couple months!
Cheers to an organized (and defrosted) deep freezer!
Rebecca S. says
What do you keep your freezer set on? Thanks
Andrea says
I think freezers are usually set to 0*F. Our deep freezer doesn’t have an exact temperature gauge — just a dial for “cold, colder, and coldest”. We have it set to “colder” as that is what was recommended.
Cheryl says
Our upright freezer had a drain in the bottom, that you could attach to a garden hose….that way you just let it all drip down into the bottom and it went out the hole in the center, then out the hose which went out the door and into the grass! No drip pans that way! I would sit a couple pans with hot water in them IN the freezer to speed up the melting process also.
Andrea says
Our freezer has a drain too — but the hose isn’t lone enough to come out the front and connect to a hose! So dumb, I know!
Aa. says
I was never told that after defrosting I just wait two hours before putting back all the food. i always put it directly in the freezer once it is clean (just before i plug it).
Why do you do so?
Andrea says
The only reason we waited was because we figured out food would stay colder outside than in a temperature freezer that was still pretty warm from running a space heater in it.
So, we let the freezer cool way down and then brought the still-cold food in from outside. If we had put the cool food in the warm freezer, it most likely would have defrosted a bit — which is one way food gets freezer burned more quickly.
I’m sure you don’t have to do what we do… but it seems to work for us 🙂
Tonya says
love the reminder. I have an upright freezer and did similar to you when defrosting it. Last time I stepped up my organization skills in the freezer and added bins. We grow an acre or more of sweet corn every year and flat freeze it in bags. Instead of the bags taking over the freezer I got a plastic hanging file crate (think back to school/dorm rooms or office supply area) and stacked them in it. It’s like a drawer for the upright! I also took the ice cube collector from an old freezer and used that for meats and a drawer from the beer fridge that we didn’t need and used that for other garden produce. It left my big drawer for bulkier items and really helped me to actually find things. As a kid my parents used boxes or left items in plastic grocery bags to be able to reach them from the bottom. What a pain! The filing crate would work great in that situation too, and could be stacked! Can use a colored crate to organize them too- red for meats, green for veg., blue for fruit, etc
Andrea says
Sounds like you have a pretty good system going on for freezer organization! As you can probably see by the pictures, I’m a big “shoe-box-in-the-freezer” fan 🙂
We have at least 3-5 shoe boxes helping to organize our freezer — they’re cheap and they work!
Jo says
To speed things up I always boil the kettle and pour about half an inch of hot water into each of the oven trays (or mixing bowls, pots, whatever I have at hand). Makes it defrost waaaaaaay quicker as the steam melts the ice away.
Then just pick at it, like you Andrea, with something plastic.
Normally I can leave it to collect most of the water in the trays or bowls, and defrost by itself while I do something else. 🙂
Mary Ann says
I put some bowls of boiling water in ours too, when defrosting. I don’t usually do any picking. It all melts off pretty fast by itself.
I also put a thick old blanket on the floor in case of dripping.
We defrost our freezer about once a year.
Kelekona says
I think that the last time I defrosted my chest freezer, I dumped everything into laundry baskets or pulled out the boxes that I keep in the freezer as dividers, and just covered everything with blankets.
Then I used bath-temperature water to scrub at the ice then wash the walls. I soaked up the water, gave it a good drying, then chucked everything back in. No waiting, just less than an hour’s worth of frantic movement.
CJ says
Thanks for sharing Andrea! I live pretty much across the great lake from you (literally) and it never even crossed my mind to just box all the food up and leave it out in this wonderful weather we’ve been having. I am definitely going to do that with our chest freezer we have in our garage – your way will be so much easier than attempting to take care of everything in the summer with all of the humidity!
Andrea says
haha — yes, putting the food outside in the cold is probably the best way we’ve come up with to keep it REALLY cold. However, we’ve always had our freezers inside — I’m not sure I would have wanted to be outside in a cold garage in the middle of winter just to defrost our freezer 🙂
Deni says
Thanks for this post, Andrea! We had a snow system come in yesterday, and we don’t usually get much snow in NC. So today will be perfect to clean out, and defrost our chest freezer. I can just put everything in laundry baskets and sit them in the snow. January really is the perfect time to purge, organize and do projects like this. That’s what I love about your blog, the reminders of things like this 😉
Deni says
Done! I have a chest freezer and it took me all of :30 minutes. Unloaded , Hubby put baskets in snow, bucket of warm water with rag to soften frost, scrape with plastic scraper, used broom dust pan to scoop up ice, sanitized freezer with equal parts vinegar and warm water, reloaded and organized food. Now to look for old milk crates to store food more easily accessible. Thanks again, Andrea!!!
Tonya says
I’ve used the plastic filing crates that you see around back to school time or in the office supplies area to organize the freezer. works great, can even get different colors for different food types. red for meats, green for veggies blue for fruits etc.
Deni says
Thanks for the tip 🙂
Andrea says
Wow — good for you! Sounds like you must have worked up a sweat. I’m sure your freezer looks fabulous!