I’ve mentioned before that I enjoy sending out Christmas cards each year — and I really do. I love finding the perfect picture, deciding what I want the card to say, including a brief yearly update, stuffing, stamping, hand-addressing them, etc. I thoroughly enjoy getting Christmas cards (or any type of card) in the mail and I love sending them too.
Obviously, thanks to email, scanners, and Facebook, I rarely need to send any snail mail these days — however along with my love for sending Christmas cards to friends and family, I also get way too excited about sending thank-you cards and birth announcements.
I love coming up with ideas for the cards, writing the notes, addressing the envelopes, and mailing them out.
The only thing I don’t love about them is the price. It’s ridiculous how much custom stationery can cost — even with a discount code or coupon. Plus, I’ve never been 100% satisfied with the un-customizable layouts. And of course, if you pay someone else to design the card for you, that’s just another added expense.
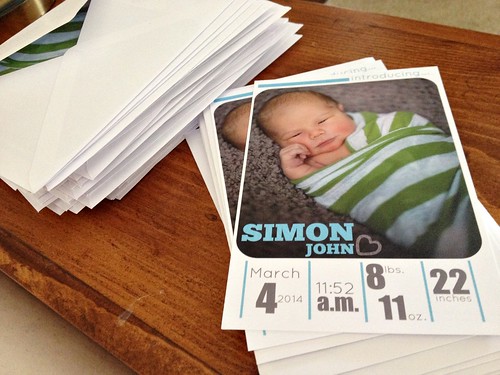
So when Nora was born, I set out to design my own stationery — and much to my surprise, it was actually pretty simple. So simple that I’ve done it many times since then and saved myself a bunch of money in the process.
Here’s how I did it.
I decided on the picture I wanted to use (vertical or horizontal) and then went to VistaPrint.com to check out the sizes they offer.
NOTE: This is not a sponsored post — I’ve just found that VistaPrint is one of the only places that allows me to upload my own fully customized design. Plus, they always have really great discount coupon codes!
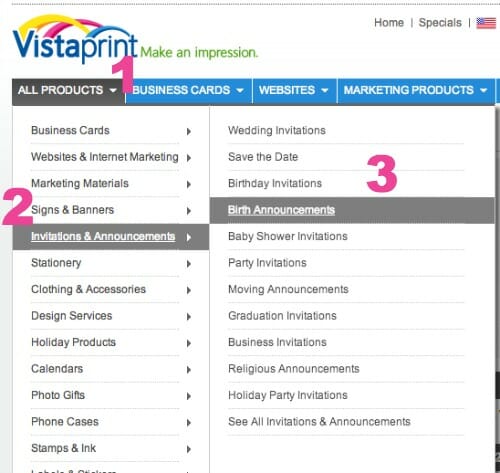
Even though I upload my own design, I still have to start by choosing a specific type of stationery.
I chose “Birth Announcements” as that’s what I was making, but you can obviously choose any type of stationery you want. It really doesn’t matter since you’ll be uploading your own complete design.
Once you choose a type of stationery (baby, wedding, holiday, etc) then you’ll choose the size. I chose a 5″ x 7″ flat vertical card.
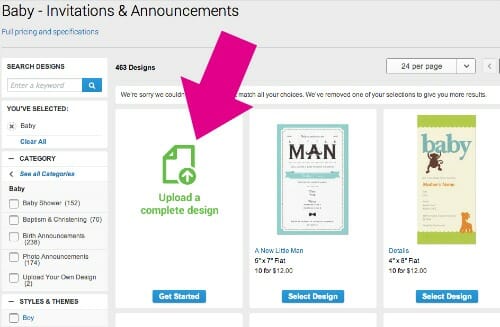
Then, you’ll see the option to “upload a complete design”. This is what you want to click on.
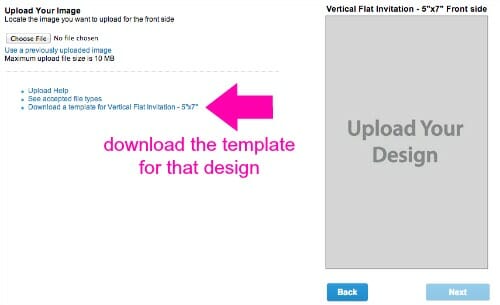
After that, you’ll see the screen below — which gives you the option to “Download the Template for that design”. This step is not 100% necessary, but it will make your design time go a little faster.
Once you have your template and know exactly what size you need to make your uploadable image, then you can go to your favorite photo editing program and get creative.
I use PicMonkey.com — simply because it’s what I use to edit all the photos for my blog, it’s free, and it’s REALLY simple.
I’ve been using PicMonkey for a long time so I’m very comfortable playing around with it and have learned a lot about how to use their tools. It didn’t take me long to come up with the following design for our baby announcement
Here’s the front:
Here’s the back:
If you can’t come up with a design idea, just go to Pinterest and search for whatever type of card you’re trying to create. I’m certain you’ll find HUNDREDS of ideas!
.
Once I had the card front and back created, I simply uploaded them into my blank card via the VistaPrint website and then added that item to my cart.
Since VistaPrint is always offering deals, I was able to get 80 birth announcements (full color on the front and back) with envelopes and shipping for right around $30 — which is probably 1/4th to 1/5th the cost of ordering custom birth announcements! Plus, I made them to my exact specifications!!
While I was at it, I went ahead and ordered some really basic thank-you notes.
These cards literally took me less than 10 minutes to create — I just uploaded that picture and typed the words “Thank You” on it. I ordered these only one week after Simon’s birth so I could use them for all the generous gifts and delicious meals we received.
I spent $15 total for 40 cards and envelopes. I honestly think it might have cost me more to buy packages of Thank You notes from Target!
So, if you’re looking for inexpensive yet totally customized stationery for pretty much any occasion, consider designing it yourself and printing it through an inexpensive printer like VistaPrint.com





Victoria @ Creative Home Keeper says
Your birth announcements are adorable and they do look like customized made one. So glad you shared how you did this on your own, now my head is spinning of ideas for future cards. Thanks! 🙂
Andrea says
Thanks Victoria 🙂
Erica says
I rarely send out notes on stationery, but I do save money by creating my own greeting cards – it’s a little more time consuming, especially at Christmas time, but usually two boxes of ink jet greeting cards last me the entire year. I usually look for appropriate graphics online, although I did recently download some holiday graphics off of bigstockphoto.com when I had a free month’s membership there.
BTW, you do know you used the wrong form of the word stationery, right? 🙂 Great tips as usual Andrea.
Laurel says
Thanks for this, Anrea. I need to make graduation open house invitations and I am going to try to follow your instructions exactly. We’ll see how I do. I am so challenged by these things! Cute announcements, by the way.
Leigh says
We have been happy with Vistaprint. We used them for our christmas cards and announcements. I also have waited until they, or another site had a great deal and used a recent cute picture of the kid(s) or of some of their art and had 10ish cards made to use as thank yous etc.
Amy O says
Your cards are adorable, Andrea. However, I feel I have to give your readers a word of caution about using Vistaprint. They have had numerous lawsuits filed against them for deceptive business practices. In our case, they signed us up for a “club” that we never agreed to and began charging us a monthly fee. It was a small monthly fee ($5 a month I think) but we never agreed to it – and there were no benefits to belonging to this “club.” When we complained, they sent me a check to cover the money they had stolen from us, primarily because they have had several class action lawsuits filed against them for these practices. I used to use them because i thought they were a great deal – I will NEVER use them again.
A link about the class action suits against them: http://www.topclassactions.com/lawsuit-settlements/lawsuit-news/4639-vistaprint-class-action-lawsuits-continue/
Jules says
VistaPrint is the best! I used them for all the reasons you mentioned above to make Save the Date announcements for our wedding. I did not want to spend too much time or money (it was just a Save the Date card, and many people would probably trash it) and it was so easy! Thanks for the step-by-step I will definitely be using them in the future and you just saved me a bunch of time!
Enjoy your first Easter as a family of 4
Shannon says
I love Vistaprint! I used them to make postcards for both of my daughters’ graduation open houses and the banners for the front yard. The price was right and the designs were awesome!
Lydia @ Five4FiveMeals says
Also, sometimes VistaPrint will have a Groupon Deal.
Lydia @ Five4FiveMeals says
I did the same thing for our custom thank you notes and birthday invitations. I have found VistaPrint’s quality to not be consistent, though. However, if you express your disappointment they are quick to remedy the issue.
Esther says
I recently made my son’s dedication invitation using Paint.net. I use it to make graphics for my church bulletin/calendar all the time and you can save your creations as JPGs as well as many other formats. So I added the picture added text to it and saved it as a JPG. Then I just printed it as a picture via Walgreens (because they were having a sale on photos and it was near my house to pick up) I spent $9 on 50 pictures and didn’t have to pay for a design because I used the free software and fun fonts I got for free. I wish I would have thought of this after he was born it would have saved me a lot of money. Definitely doing the same thing for our Christmas Cards this year.